Do you have departments that you allocate expenses to?
Sage 300 General Ledger has an auto allocation feature that enables you to seamlessly allocate expenses.
Turn on Auto Allocation
Before you can start allocating expenses, you first need to set it up in the accounts that where you will allocate from.
Auto allocation is a feature that needs to be turned on and set on accounts individually.
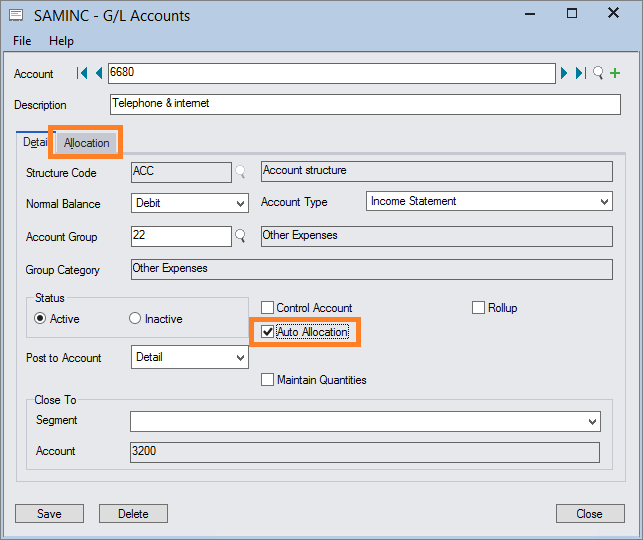
Find and select the account you wish to set auto allocation for, then check the Auto Allocation box as shown.
A new tab “Allocation” will be added to the screen.
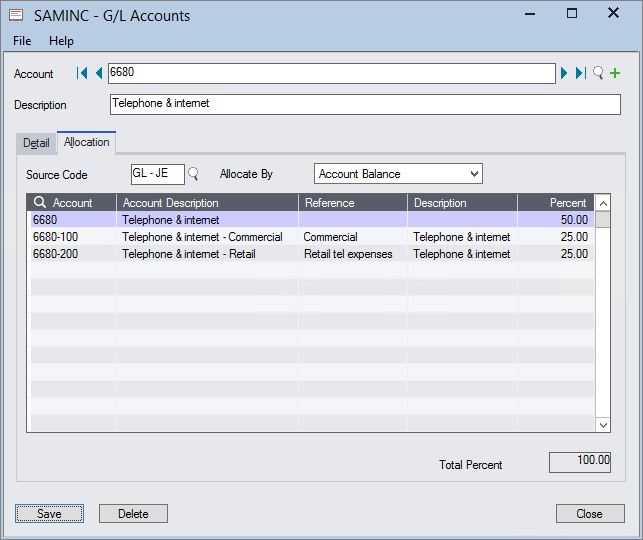
Select the Allocation tab, and add the accounts that you want to allocate the expenses to along with the percentages.
Note that the percentage total must equal 100%.
In this example, we are allocating 25% of the Telephone & Internet expenses to the Commercial and Retail divisions while retaining 50% in the main account.
Allocate expenses
Once you have entered all the expenses for the month into the main account, the next step would be to allocate them.
You would do this once a month in the process of finalising your accounts.
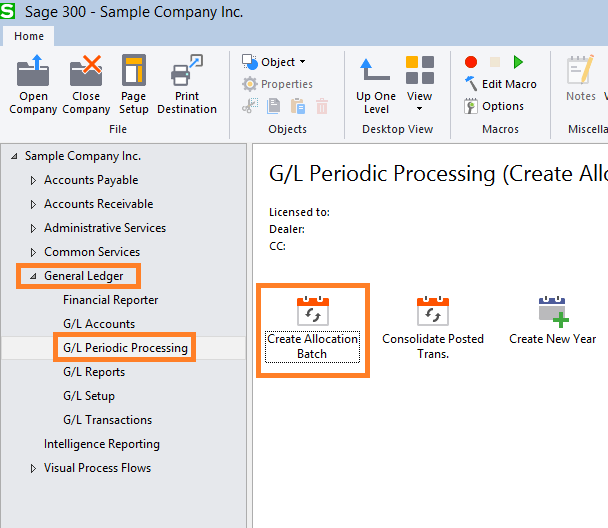
Go to General Ledger, G/L Periodic Processing, then double click on Create Allocation Batch.
Here, you can create a batch of transactions that will allocate balances in accounts that use the Auto Allocation option to other accounts, and creates the offsetting details.
- In the Batch Description field, enter a brief description for the batch using up to 60 characters.
- In the Create Batch For field, specify whether to use the full account number or one of the account segments to select accounts from which to reallocate balances.
- In the From and To fields, specify the range of account numbers or account number segments.
- Enter the journal entry date and the fiscal year and period to which to post each entry.
- In the Allocation Method field, specify whether to allocate account balances, quantities, or both the balances and the quantities.
If you allocate account quantities, also specify the range of fiscal periods for determining the net changes in quantity. - Finally, click the Process button to generate the allocation batch.
After creating an allocation batch
Sage 300 will create a single, balanced entry for each allocated account, consisting of the details that allocate the account balance (and quantities, if allocating by account quantity) and an offsetting detail, using the date and fiscal period you specified for posting.
Entries are assigned to the next open batch, which you can view, edit, and post in the same way as other batches.
Any remainder of an allocated account balance is included in the last detail line of the entry.
You can then use the Batch Listing screen to print batch listings.


